
Securing and Optimizing Networks: Using pfSense Traffic Shaper Limiters to Combat Bufferbloat
[This is a guest diary by Yee Ching Tok (personal website here (https://poppopretn.com)). Feedback welcome either via comments or our contact page (https://isc.sans.edu/contact.html)]
In light of recent challenges brought about by COVID-19, the need for remote work, meetings, training, and learning has increased exponentially. A secure and optimized network would certainly allow users to do their best, despite being unable to work from their usual offices. I was recently asked if the addition of an open-sourced firewall, such as pfSense, would introduce network latency, reduce network speeds and affect productivity. A concern brought up was the issue of Bufferbloat, which is briefly defined as high latency within the network when multiple types of network traffic [for example bulk traffic (think upload/download)] hinders time-sensitive traffic (think gaming, Zoom/Skype, etc) [1]. This phenomenon is usually caused by a router lacking the ability to execute Smart Queue Management (SQM) for the network traffic. After some experiments and research, I would like to share that using pfSense’s Traffic Shaper Limiters could help optimize networks and address potential Bufferbloat issues. I also further discuss some settings that were tweaked and tested (vis-à-vis what is usually outlined) that ensure conformance to cybersecurity best practices while network performance is optimized.
Note: All networks are unique, and multiple factors can affect network performance. Processing power and availability of memory do affect the capability of a pfSense firewall, so please make sure to buy/build an appropriately sized firewall that matches the network bandwidth requirements. There are also alternative solutions that address Bufferbloat issues, such as using Ubiquiti products [2] or Untangle NG Firewall [3]. Last but not least, please remember to do a config backup on your pfSense firewall before changing anything, and test the changes made in a test network before deploying them into the production environment.
1) Assess network condition
Firstly, assess your network connection with your ISP. The website DSLReports (https://www.dslreports.com/speedtest) is suitable to start with. Start the test by selecting the appropriate connection type (E.g. Gigabit/Fiber, Cable, DSL, etc). Note down the final result, especially the grade for Bufferbloat.
2) Set up Download Limiter
Next, log in to the pfSense Web GUI, and navigate to the Limiters section. (Click on “Firewall” > “Traffic Shaper”). Following that, click on “Limiters”, and select the “New Limiter” button on the left side of the menu (Please refer to Figure 1 for the areas to select).

Figure 1: Creating a New Limiter (Download Limiter)
Input the following configurations (Please refer to Figure 2 for a screenshot of the configuration) for the new Limiter:
Enable – Enable limiter and its children (Check this box)
Name – WANDownload (Feel free to name it otherwise, no spaces allowed)
Bandwidth – Input the bandwidth for download as subscribed from your ISP, and select the unit (Bit/s, Kbit/s, Mbit/s). Leave the “Schedule” field unmodified. (In Figure 2, I used 1000 Mbit/s. Please adjust the values here according to your ISP subscription, or at least the guaranteed speed you are aware that the ISP is giving you.))
Mask – None
Description – WAN Download Speed (Feel free to name it otherwise, spaces allowed)
Queue Management Algorithm – CoDel
Scheduler – FQ_CODEL (Note: You can set the value of the “quantum” parameter to 300 if you want to give priority to Voice over IP (VoIP) traffic. In addition, if your pfSense firewall is not constrained by memory, you can change the value of the “limit” parameter to 20480, and the value of “flows” parameter to 65535. Figure 2 does not show this yet, but you will be able to see these fine-grained settings after you save the limiter.)
Queue Length – 1000 (for a connection with higher bandwidth, this value can be increased to 2000/5000/10000. Start off with 1000 first.)
ECN – Enable Explicit Congestion Notification (Check this box)
At the bottom of the page, click “Save”. Do not navigate away from the page just yet.

Figure 2: Configuration of Download Limiter
Note: You will get the following message “The traffic shaper configuration has been changed. The changes must be applied for them to take effect.”. This message can be ignored, as the changes can be applied later in one go once the download and upload limiters and queues are configured.
3) Set up Download Limiter Queue
After clicking the “Save” button, click on the “Add new Queue” button next to it (Please refer to Figure 3 for the illustration). Note: pfSense may not direct you to the Queue configuration page even after you select the “Add new Queue” button. You will notice this if you see the input for bandwidth (this is not needed for Queue configuration). In this case, select the limiter you have just created, e.g. “WANDownload”, on the left side of the menu. Scroll down, and click on the “Add new Queue” button again. You will then be redirected to the Queue configuration page.
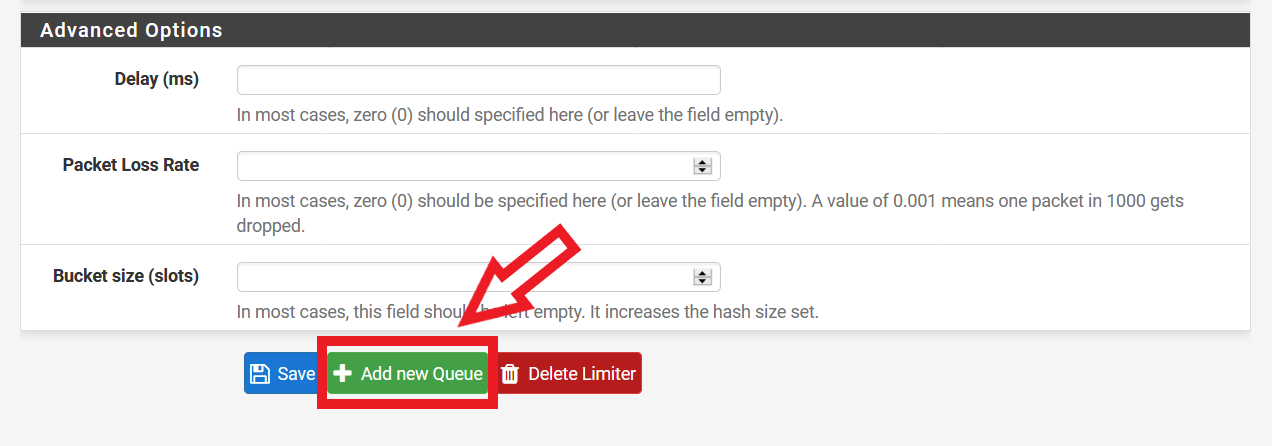
Figure 3: Selecting the “Add new Queue” Button after Configuring Download Limiter
Input the following configurations (Please refer to Figure 4 for a screenshot of the configuration):
Enable – Enable this queue (Check this box)
Name – WANDownloadQueue (Feel free to name it otherwise, spaces not allowed)
Mask – None
Description – WAN Download Queue (Feel free to name it otherwise, spaces allowed)
Queue Management Algorithm – CoDel
Queue Length – (Leave this blank)
ECN – Enable Explicit Congestion Notification (Check this box)
At the bottom of the page, click “Save”.
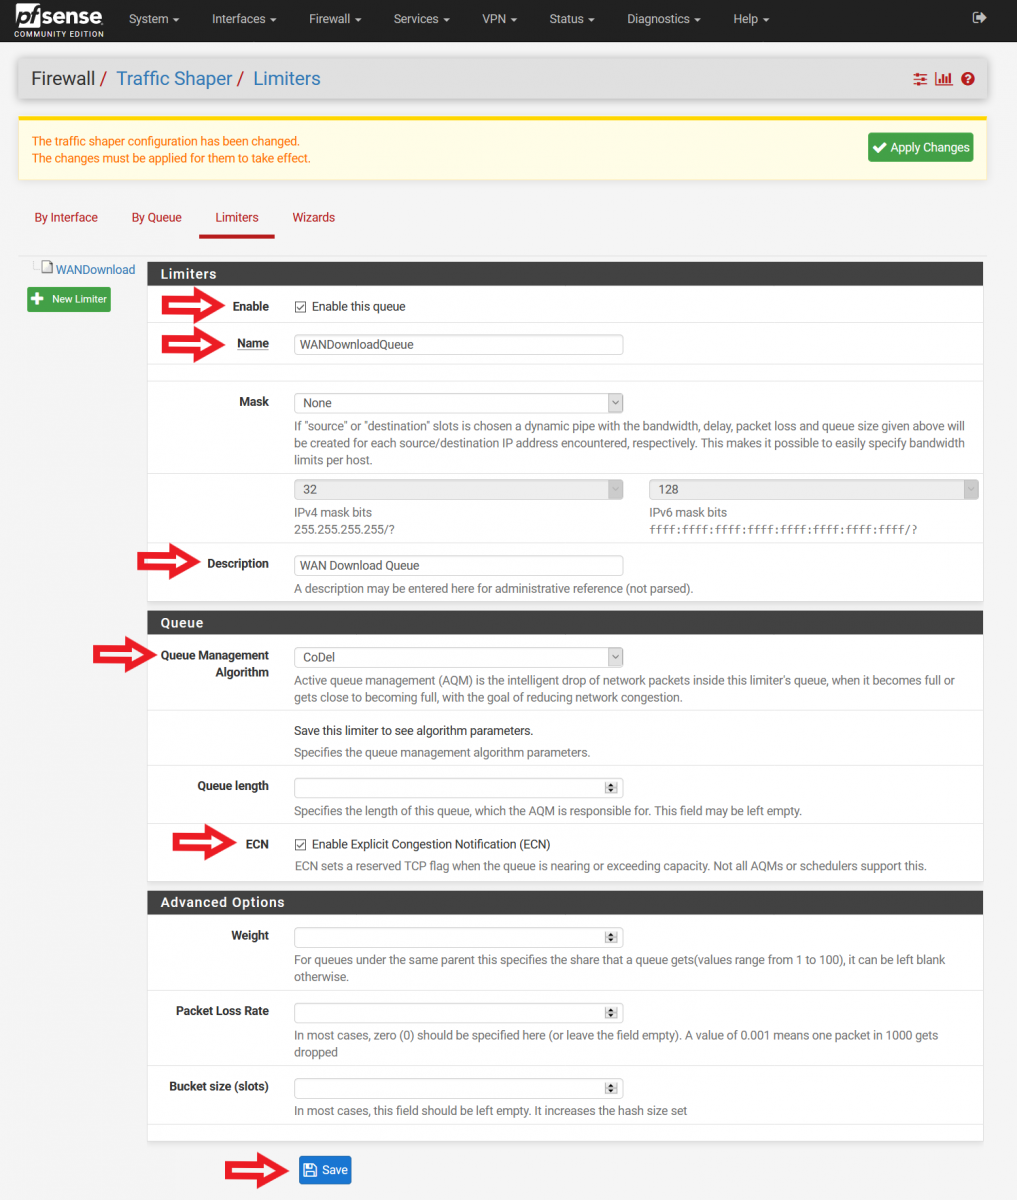
Figure 4: Configuring Download Limiter Queue
4) Set up Upload Limiter
It is now time to set up the Upload Limiter. Select “New Limiter” on the left side of the menu (Please refer to Figure 5 on how things should look like now).
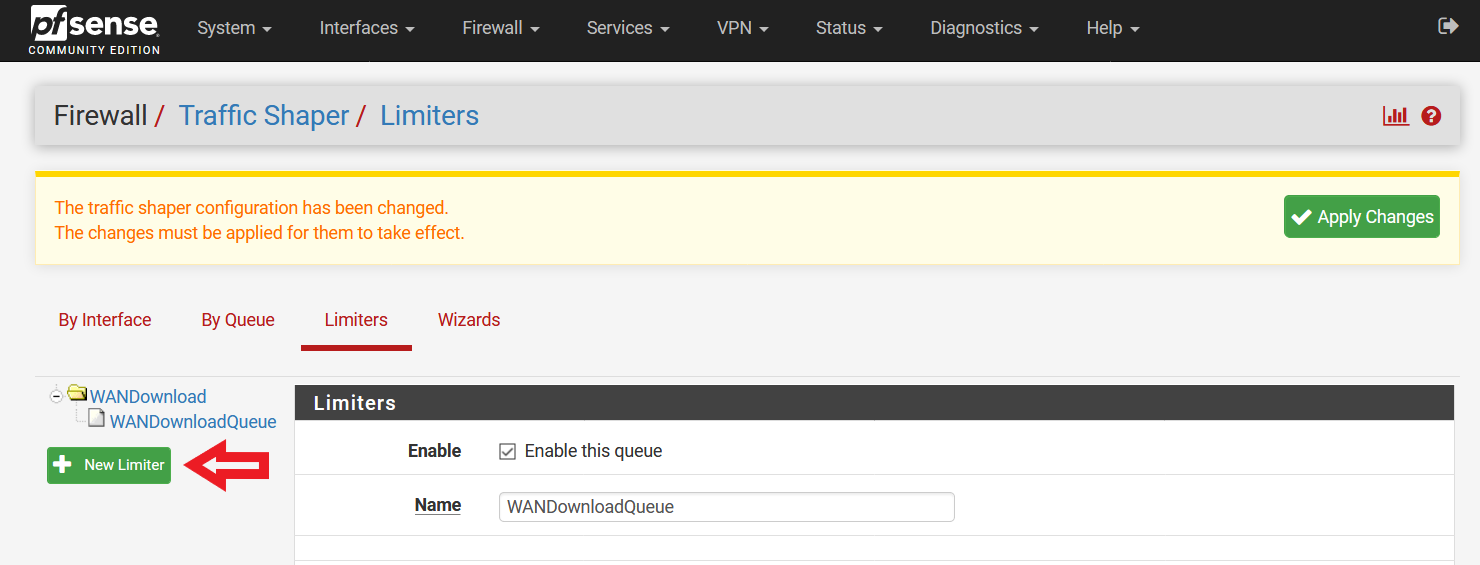
Figure 5: Creating a New Limiter (Upload Limiter)
Input the following configurations (Please refer to Figure 6 for a screenshot of the configuration):
Enable – Enable limiter and its children (Check this box)
Name – WANUpload (Feel free to name it otherwise, no spaces allowed)
Bandwidth – Input the bandwidth for upload as subscribed from your ISP, and select the unit (Bit/s, Kbit/s, Mbit/s). Leave the “Schedule” field unmodified. (In Figure 6, I used 500 Mbit/s. Please adjust the values here according to your ISP subscription, or at least the guaranteed speed you are aware that the ISP is giving you.)
Mask – None
Description – WAN Upload Speed (Feel free to name it otherwise, spaces allowed)
Queue Management Algorithm – CoDel
Scheduler – FQ_CODEL (Note: You can set the value of the “quantum” parameter to 300 if you want to give priority to Voice over IP (VoIP) traffic. In addition, if your pfSense firewall is not constrained by memory, you can change the value of the “limit” parameter to 20480, and the value of “flows” parameter to 65535. Further explanations available here [4].)
Queue Length – 1000 (for a connection with higher bandwidth, this value can be increased to 2000/5000/10000. Start off with 1000 first.)
ECN – Enable Explicit Congestion Notification (Check this box)
At the bottom of the page, click “Save”. Do not navigate away from the page just yet.
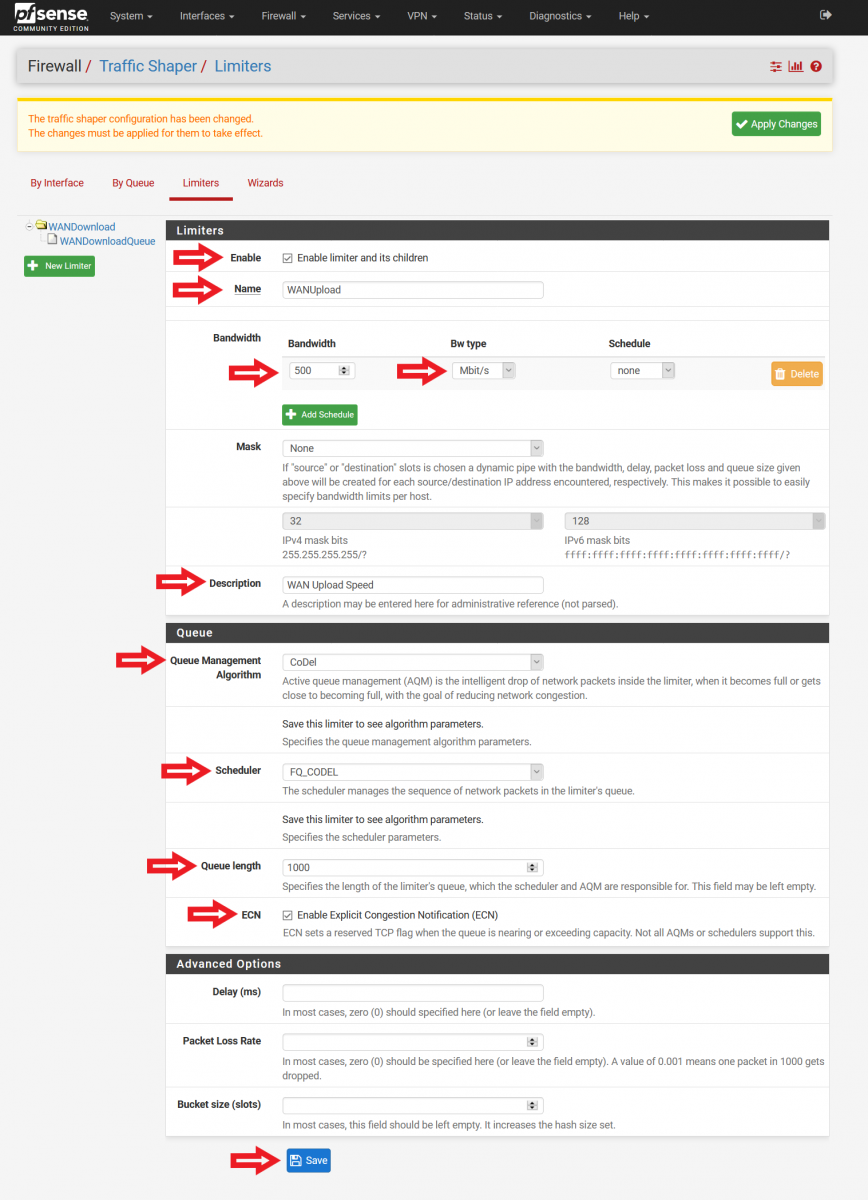
Figure 6: Configuration of Upload Limiter
5) Set up Upload Limiter Queue
After clicking the “Save” button, click on the “Add new Queue” button next to it (Please refer to Figure 3 for the illustration). Note: pfSense may not direct you to the Queue configuration page even after you select the “Add new Queue” button. You will notice this if you see the input for bandwidth (this is not needed for Queue configuration). In this case, select the limiter you have just created, e.g. “WANUpload”, on the left side of the menu. Scroll down, and click on the “Add new Queue” button again. You will then be redirected to the Queue configuration page.
Input the following configurations (Please refer to Figure 7 for a screenshot of the configuration):
Enable – Enable this queue (Check this box)
Name – WANUploadQueue (Feel free to name it otherwise, spaces not allowed)
Mask – None
Description – WAN Upload Queue (Feel free to name it otherwise, spaces allowed)
Queue Management Algorithm – CoDel
Queue Length – (Leave this blank)
ECN – Enable Explicit Congestion Notification (Check this box)
At the bottom of the page, click “Save”.

Figure 7: Configuring Upload Limiter Queue
It is now time to apply the changes made. Click on the “Apply Changes” button on the top of the page (Please refer to Figure 8). After applying the changes, you will see a message stating “The changes have been applied successfully.”.
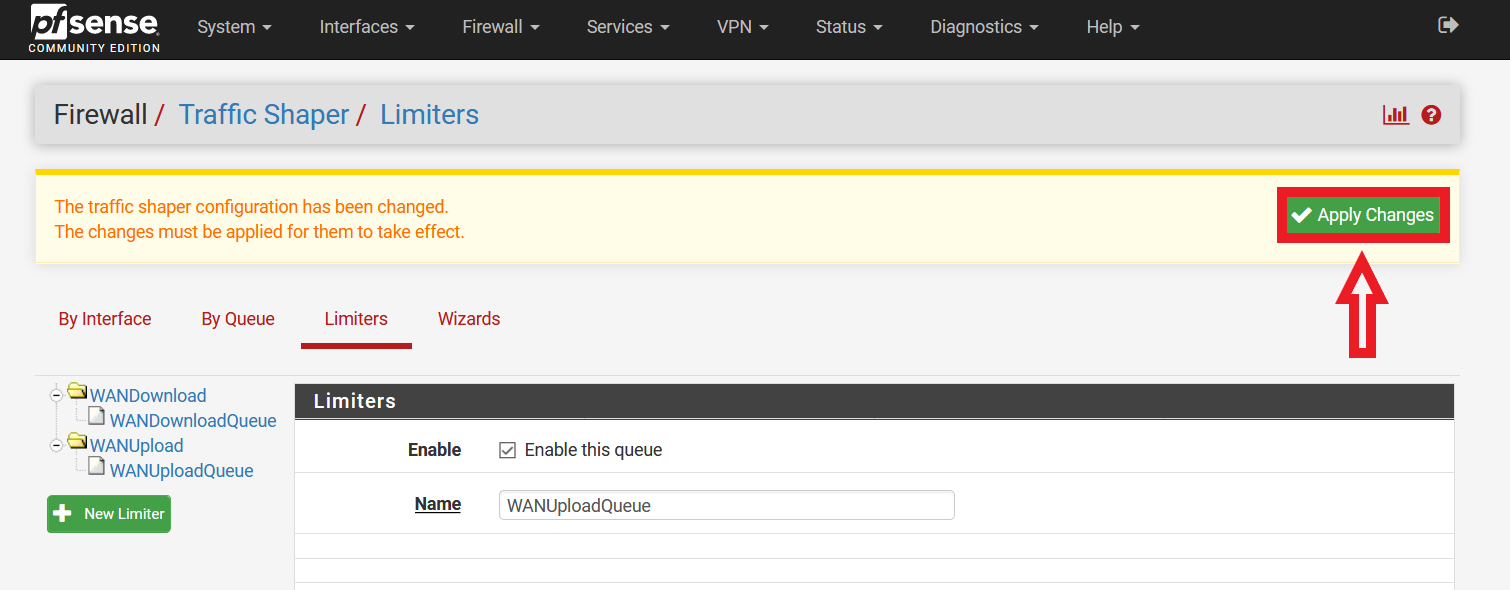
Figure 8: Applying Changes Made to Traffic Shaping Limiters and Queues
6) Set up Floating Firewall Rules
Navigate to the pfSense Firewall Rules page (Click on “Firewall” > “Rules”). Following that, click on “Floating” (by default, you will be brought to the “WAN” rules page). Select the first “Add” button (With reference to Figure 9, the button highlighted by the red box and with the arrow pointing up).
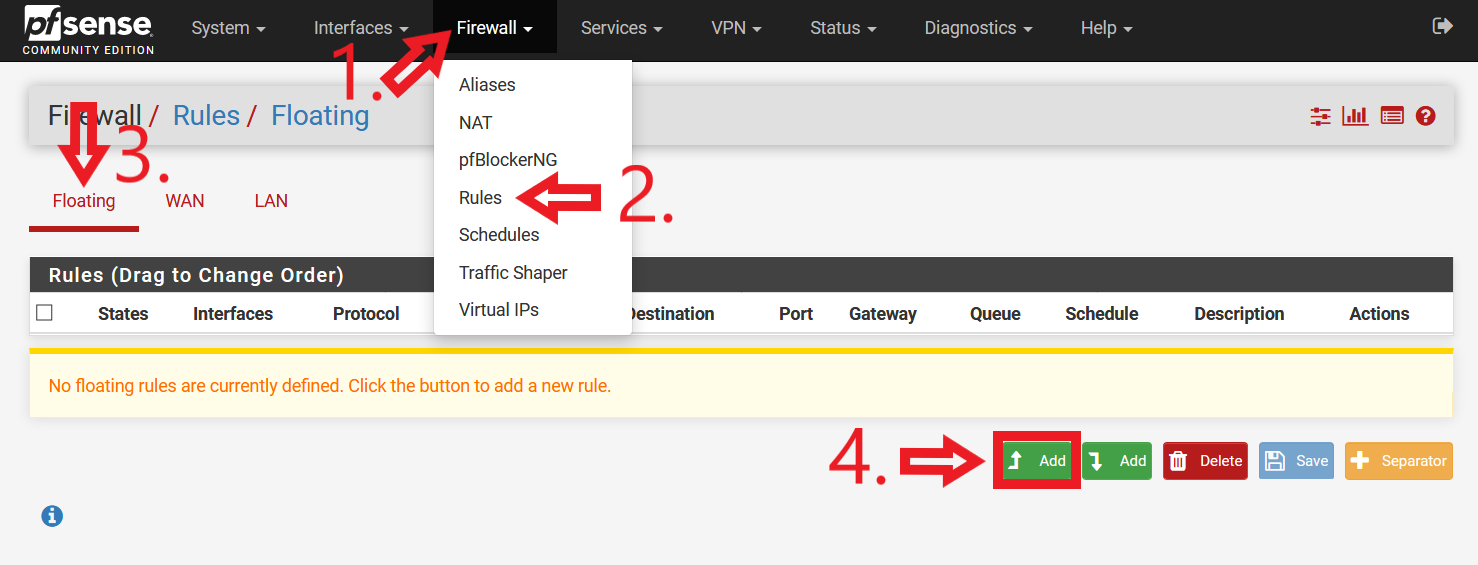
Figure 9: Navigating to pfSense Floating Rules and Adding First Rule
Floating Rule #1 (Please refer to Figure 10 for a screenshot of the configuration):
• Action: Pass
• Quick: Tick Apply the action immediately on match.
• Interface: WAN
• Direction: out
• Address Family: IPv4
• Protocol: ICMP
• ICMP subtypes: Traceroute
• Source: any
• Destination: any
• Description: Traceroute routing workaround
• Advanced Options: Click on “Display Advanced”.
Scroll down.
• Gateway: Do not use Default. Select your firewall WAN gateway.
Click “Save”. You will see a message “The firewall rule configuration has been changed. The changes must be applied for them to take effect.” on the top of the GUI (with reference to Figure 11). This message can be ignored, as the changes can be applied later in one go once all the firewall rules have been configured.
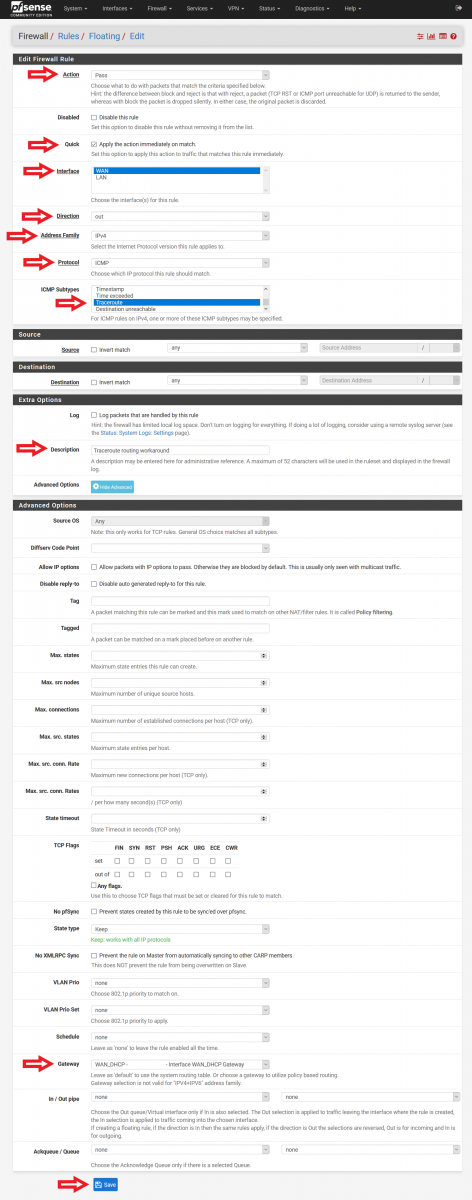
Figure 10: Configuration of Floating Rule for Traceroute Routing Workaround
This rule is required for users who experience their pfSense firewall not being able send out ICMP traceroute [5] when Traffic Shaper Limiters are used. I personally did not experience this when I tested my configuration, and thus disabled this Floating Rule.
Select the second “Add” button (With reference to Figure 11, the button highlighted by the red box and with the arrow pointing down).
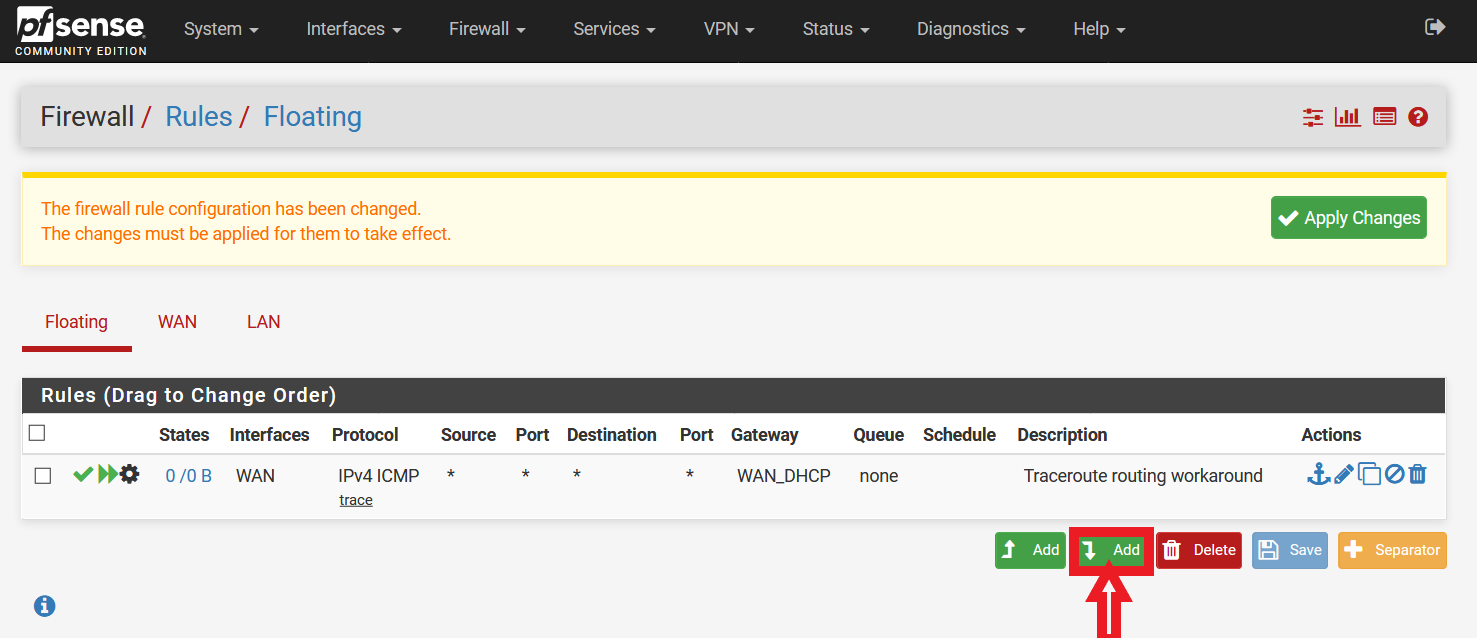
Figure 11: Addition of Second Floating Rule
Floating Rule #2 (Please refer to Figure 12 for a screenshot of the configuration):
• Action: Pass
• Quick: Tick Apply the action immediately on match.
• Interface: WAN
• Direction: out
• Address Family: IPv4
• Protocol: ICMP
• ICMP subtypes: Echo reply, Echo Request
• Source: any
• Destination: any
• Description: Limiter drop ping traffic under load workaround (Bug #9024)
• Advanced Options: Click on “Display Advanced”.
Scroll down.
• Gateway: Do not use Default. Select your firewall WAN gateway.
Click “Save”.
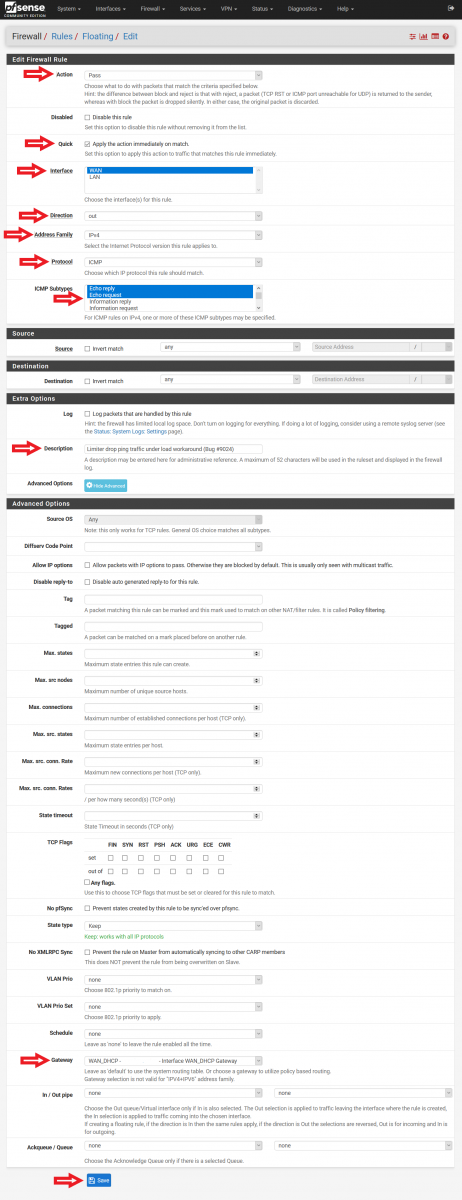
Figure 12: Configuration of Floating Rule for Limiter dropping Ping Traffic Under Load
This rule is required for users who experience their pfSense firewall dropping ping traffic when it is under heavy load when Traffic Shaper Limiters are used [6]. I personally did not experience this when I tested my configuration, and thus disabled this Floating Rule. In addition, a particular note has to be taken on the “Direction” option. While it is tempting to put “any” instead of “out”, “any” will allow the pfSense firewall to respond to incoming ping requests (something which many users may not want their firewalls to do so).
Next, we have to create the floating rules that will optimize the network traffic. There are some who suggest the usage of a single “Pass” action floating rule, and with the “Direction” option configured to “out”. This is not recommended. Firstly, according to Netgate documentation, Traffic Shaping related rules should utilize the “Match” action [7]. Secondly, by using only “out” for the “Direction” option, only outgoing traffic will be optimized and incoming traffic ignored. As such, 2 floating rules (one for incoming, and one for outgoing) should be created. They are as follows:
Select the second “Add” button (With reference to Figure 11, the button highlighted by the red box and with the arrow pointing down) again.
Floating Rule #3 (Incoming Traffic) (Please refer to Figure 13 for a screenshot of the configuration):
• Action: Match
• Interface: WAN
• Direction: in
• Address Family: IPv4 (Select IPv4+IPv6 if the network has IPv6 traffic)
• Protocol: Any
• Source: any
• Destination: any
• Description: WAN Incoming Traffic Queue
• Advanced Options: Click on “Display Advanced”.
Scroll down.
• Gateway: Do not use Default. Select your firewall WAN gateway.
• In / Out pipe: WANDownloadQueue / WANUploadQueue
Click “Save”.
.png)
Figure 13: Configuration of Floating Rule for Incoming Traffic
Select the second “Add” button (With reference to Figure 11, the button highlighted by the red box and with the arrow pointing down) for the last time.
Floating Rule #4 (Outgoing Traffic) (Please refer to Figure 14 for a screenshot of the configuration):
• Action: Match
• Interface: WAN
• Direction: out
• Address Family: IPv4 (Select IPv4+IPv6 if the network has IPv6 traffic)
• Protocol: Any
• Source: any
• Destination: any
• Description: WAN Outgoing Traffic Queue
• Advanced Options: Click on “Display Advanced”.
Scroll down.
• Gateway: Do not use Default. Select your firewall WAN gateway.
• In / Out pipe: WANUploadQueue / WANDownloadQueue
Click “Save”.
.png)
Figure 14: Configuration of Floating Rule for Outgoing Traffic
Finally, you can go ahead to click the “Apply Changes” button at the top of the GUI to apply the created firewall rules (Please refer to Figure 15). After applying the changes, you will see a message “The changes have been applied successfully. The firewall rules are now reloading in the background. Monitor the filter reload progress.”.
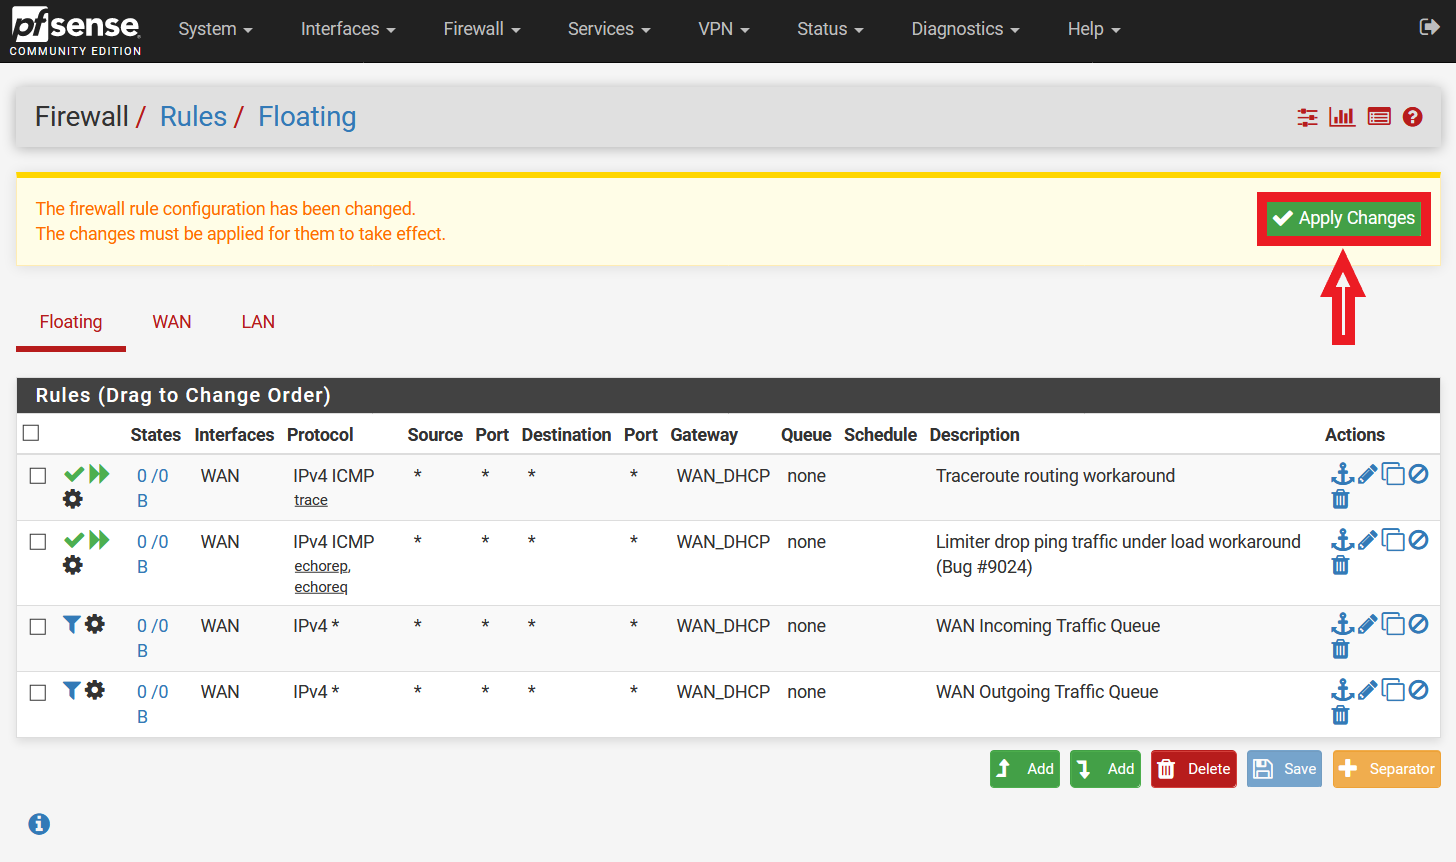
Figure 15: Applying Firewall Rules
7) Re-assess network condition
Finally, re-assess your network connection with your ISP at the DSLReports website. (https://www.dslreports.com/speedtest). Start the test by selecting the appropriate connection type (E.g. Gigabit/Fiber, Cable, DSL etc), and the grade for Bufferbloat should have improved with the implementation of Traffic Shaping Limiters and Queues.
That is all! I hope this guide has been useful in introducing network enhancements while maintaining the security of networks, especially for pfSense users. Do note that implementing Traffic Shaping may require a bit of further tweaking (e.g. Download and Upload Limiters, especially the parameter values under the Scheduler option highlighted in Steps 2 and 4 previously) due to various factors (e.g. ISP, geolocation, business requirements, equipment, etc). However, the steps outlined above should be enough to get you started on optimizing networks (especially home networks) that are increasingly being used for work, studies and personal entertainment.
[1] https://www.bufferbloat.net/
[2] https://help.ubnt.com/hc/en-us/articles/220716608-EdgeRouter-Advanced-queue-CLI-examples
[3] https://wiki.untangle.com/index.php/Bufferbloat
[4] https://forum.netgate.com/post/807490
[5] https://docs.netgate.com/pfsense/en/latest/troubleshooting/traceroute-output.html
[6] https://redmine.pfsense.org/issues/9024
[7] https://docs.netgate.com/pfsense/en/latest/firewall/floating-rules.html
Update: This post has been updated to address an issue reported by a reader where the order of the traffic flow in the floating firewall rule was configured in the wrong orientation.
| Application Security: Securing Web Apps, APIs, and Microservices | Washington | Jul 14th - Jul 19th 2025 |


Comments
If your internet comes from a cable provider you may want to keep in mind a few other things...
First, if you are on a DOCSIS 3.1 network AND have a DOCSIS 3.1 modem then traffic management algorithms are already in place in the form of DOCSIS-PIE and you likely don't need this. (https://ieeexplore.ieee.org/document/7060493).
Second, I have seen some cable ISPs (most recently Spectrum but it varies in different regions) where there is no set or guaranteed upload bandwidth and it fluctuates wildly. In these areas you may get an upload bandwidth of 50 or 500 Mbps depending on network conditions when you test. So I don't think that a limiter is the right tool in this scenario. You can still test with queues and see what happens.
It's worth noting that you should check in your ISPs modem for traffic shaping too as it might be easier, work better on their network, and/or require less investment in money or time.
I do have pfSense and over the years tested each of the traffic shaping algorithms. I find that fq_codel is nice because you can set it and forget it. I also had good results with PRIQ and FAIRQ but I had to monkey with them a little to get it right. These days I am lucky enough that I can buy more bandwidth than I can use and that will always be better.
Anonymous
Feb 16th 2021
4 years ago
Anonymous
Feb 16th 2021
4 years ago
There could be multiple factors at play over here. For example, Sam raised excellent points about cable ISPs (e.g. DOCSIS 3.1 network and modem, and not setting/guaranteeing bandwidth).
Some thoughts: Did you set the download bandwidth according to your ISP subscription? In addition, did your connection experience Bufferbloat before you configured the Traffic Shaping settings? It is not unusual to experience a drop in the maximum download/upload speed when Traffic Shaping is configured, but the Bufferbloat score should have improved after the configuration.
Anonymous
Feb 17th 2021
4 years ago
Will this work with dual-wan using a load balance scheme/configuration? If so, would I just set it to the load balance gateway group?
Second question is on a low bandwidth 12mb down and 1mb up connection what would be the queue length to use? Would this even work on a lower bandwidth connection at all?
Anonymous
Mar 13th 2021
4 years ago
Will this work with dual-wan using a load balance scheme/configuration? If so, would I just set it to the load balance gateway group?
Second question is on a low bandwidth 12mb down and 1mb up connection what would be the queue length to use? Would this even work on a lower bandwidth connection at all?[/quote]
Thank you for your questions.
For your first question, I have yet to be able to test the suggestions I am going to put forth to you and thus it is a theoretical approach. Firstly, I will have to assume that the 2 WAN bandwidths are the same. If they have different bandwidths, perhaps you should consider weighing the gateways in the load balance group. For a dual WAN using a load balancing scheme/configuration, you could try to use the alternative configuration as suggested over here: hxxps://forum.netgate.com/topic/57476/per-ip-traffic-shaping-share-bandwith-evenly-between-ip-addresses (Please change hxxps to https). In summary, what was done was to use 2 parent limiters (upload and download) and corresponding child queues (the number will depend on the number of subnets you have). Upload child queues would have source address mask set download queues would have the destination address mask set.
Second question - An optimal queue length depends on the speed of your link. For high speed WANs, a value of 1000 is acceptable. Hence, if your WAN speed is expected to be lower, you could set it to perhaps a value of 250 or 500. Do note that if your queue is too small, you would get packet loss and decreased throughput. However, if a queue is too large, you could end up with bufferbloat. I would argue that traffic shaping is even more vital in low bandwith networks with multiple users since there isn't much for everyone. As long as the bandwidth for limiters is configured correctly (e.g. speeds that you know you ideally would have from your ISP), it would work (Caveat: Sam's comments about a DOCSIS 3.1 network, and also ISPs that do not have guaranteed upload/download bandwidth).
Ultimately, optimization of networks is an ongoing process and certainly requires a fair bit of experimentation, testing and technological features of networking devices implemented within in the network.
Anonymous
Mar 13th 2021
4 years ago
one thing: (it's 2023.. so who knows) - "Gateway selection is not valid for "IPV4+IPV6" address family." - you mentioned to leave it to IPv4+IPv6 if both are used.. so.. doesn't work.
AndreasR
Aug 26th 2023
1 year ago
Regarding the floating rules workaround, I had to put them in place because I confirmed that kind of traffic was being dropped during high load.
What I did to test it?
I started a fast.com test, setting it up to last 240 sec each direction.
Simultaneously, I started a ping burst: ping -i 0.2 <ip address>
anon
Sep 7th 2023
1 year ago
Anyway, it doesn't seem to hurt having them in place.
anon
Sep 7th 2023
1 year ago