
Tunneling scanners (or really anything) over SSH
I am sure that many penetration testers among our readers try to minimize their travel. While many years ago we had to be physically present for internal penetration tests, today it is very common that client organizations setup virtual machines for penetration testers, which are then used to perform internal penetration tests.
In most cases this will boil down to two VMs: one with Kali Linux and the other one with your favorite scanner. However, it is also quite common that only one VM is provided and that one is used to tunnel traffic through (or pivot through it).
I was recently performing an internal penetration test where the only VM I had was a Kali Linux VM, with SSH to it.
Depending on the target environment, one can manually perform a penetration test, but since I was dealing with a larger number of machines in the scope, I wanted to run a vulnerability scanner. However, the only VM I had was the Kali Linux VM and an SSH connection.
Tunneling network traffic through the VM seems like an obvious choice, however this not all that trivial since the scanner generally needs raw access to sockets. So this diary describes one solution I came up with – let us know if you have another solution for this problem.
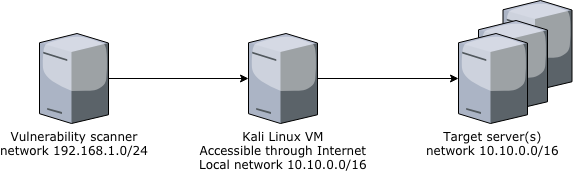
The diagram below shows our target devices. We will want to establish an SSH connection from the vulnerability scanner server to the Kali Linux VM, and use that connection to scan the target network.
SSH has extremely powerful tunneling capabilities (actually, so powerful that it is a bit scary). We will use SSH’s Tunnel option to tunnel traffic between two TUN TAP interfaces. These are virtual devices that behave as real interfaces so our scanner will not know the difference.
First we need to create such devices on both sides with the following command:
# tunctl -t tap0
Now we can assign an IP address to this interface. On the scanner server:
# ifconfig tap0 10.100.100.100 netmask 255.255.255.0
And on the Kali Linux VM:
# ifconfig tap0 10.100.100.101 netmask 255.255.255.0
We will link those devices with an SSH tunnel. Now, in order to do that we need to be root on both sides so I created an SSH key that I copied on the Kali Linux VM:
# ssh-keygen
Generating public/private rsa key pair.
Enter file in which to save the key (/root/.ssh/id_rsa):
Enter passphrase (empty for no passphrase):
Enter same passphrase again:
Your identification has been saved in /root/.ssh/id_rsa.
Your public key has been saved in /root/.ssh/id_rsa.pub.
The key fingerprint is:
SHA256:IhndAn301XGp4TkWgS1s/QyEJdmo4fh6vhR/nmmLElw root@server.local
The key's randomart image is:
+---[RSA 2048]----+
| .. .. ..%=o.o|
| o...o X.B.o |
| . o.+ = o O |
| o o o E * o |
| o . S.. . . |
| . . +o |
| .... . |
| ..o +.o |
| ooo..=. |
+----[SHA256]-----+
This allows us to login without specifying a password. Additionally, the target SSH server must allow tunneling – this can be done by adding the following line into /etc/ssh/sshd_config on the Kali Linux VM:
PermitTunnel=yes
And we are now ready – we can simply login from the scanner server to the Kali Linux VM with the following ssh command:
# ssh -o Tunnel=ethernet -f -w 0:0 root@kali.linux true
This will establish a tunnel and execute the “true” command (which does nothing), and send the process into background.
The tunnel should be up now, we can check that with the ethtool command:
# ethtool tap0
Settings for tap0:
Supported ports: [ ]
Supported link modes: Not reported
Supported pause frame use: No
Supports auto-negotiation: No
Advertised link modes: Not reported
Advertised pause frame use: No
Advertised auto-negotiation: No
Speed: 10Mb/s
Duplex: Full
Port: Twisted Pair
PHYAD: 0
Transceiver: internal
Auto-negotiation: off
MDI-X: Unknown
Current message level: 0xffffffa1 (-95)
drv ifup tx_err tx_queued intr tx_done rx_status pktdata hw wol 0xffff8000
Link detected: yes
Nice, our link is up. We can confirm that by pinging the remote tap0 interface:
# ping -c 3 10.100.100.101
PING 10.100.100.101 (10.100.100.101) 56(84) bytes of data.
64 bytes from 10.100.100.101: icmp_seq=1 ttl=64 time=0.028 ms
64 bytes from 10.100.100.101: icmp_seq=2 ttl=64 time=0.033 ms
64 bytes from 10.100.100.101: icmp_seq=3 ttl=64 time=0.031 ms
--- 10.100.100.101 ping statistics ---
3 packets transmitted, 3 received, 0% packet loss, time 1999ms
rtt min/avg/max/mdev = 0.028/0.030/0.033/0.006 ms
We’re not done yet though. We need to now configure our scanner server to send data for the target network (10.10.0.0/8 above) through that tunnel. While there are more and less complex ways to do that, I opted to simply enable forwarding on the Kali Linux server with NAT (masquerading) and setup a route to the target network.
On the Kali Linux VM:
# echo 1 > /proc/sys/net/ipv4/ip_forward
# iptables -t nat -A POSTROUTING -o eth0 -j MASQUERADE
# iptables -t nat -A POSTROUTING -o tap0 -j MASQUERADE
# iptables -A INPUT -i eth0 -m state --state RELATED,ESTABLISHED -j ACCEPT
# iptables -A INPUT -i tap0 -m state --state RELATED,ESTABLISHED -j ACCEPT
# iptables -A FORWARD -j ACCEPT
On the scanner server:
# ip route add 10.10.0.0/8 via 10.100.100.101
And we’re done – let’s test it by scanning a server in the target network:
# nmap -sT -Pn 10.10.1.37
Starting Nmap 7.01 ( https://nmap.org ) at 2018-11-05 21:48 CET
Nmap scan report for 10.10.1.37
Host is up (0.022s latency).
Not shown: 988 closed ports
PORT STATE SERVICE
22/tcp open ssh
53/tcp open domain
80/tcp open http
88/tcp open kerberos-sec
389/tcp open ldap
443/tcp open https
464/tcp open kpasswd5
636/tcp open ldapssl
749/tcp open kerberos-adm
8080/tcp open http-proxy
8089/tcp open unknown
8443/tcp open https-alt
Nmap done: 1 IP address (1 host up) scanned in 2.26 seconds
There we go – our tunnel is up and happily moving data between our networks. No more battling with proxychains! We can now simply start a scan as we would normally do and SSH will do the job for us.
Before ending this diary, let me mention another interesting tool: sshuttle (https://github.com/sshuttle/sshuttle). In many cases you can use this tool as well, its benefit is that it does not require root privilege on the target server. I had some issues running a scanner with sshuttle so YMMV.
| Web App Penetration Testing and Ethical Hacking | Washington | Jul 14th - Jul 19th 2025 |


Comments
What would be the advantage of an SSH tunnel versus a VPN tunnel?
Anonymous
Nov 7th 2018
6 years ago
Thanks for the comment!
Anonymous
Nov 7th 2018
6 years ago
If your IPS or firewall has protections against DNS and SSH tunneling be sure to enable it. If you have Check Point firewalls and IPS, their tunneling protections were never successfully bypassed by pen testers in over a decade of my experience and it detected them every time with zero false positives.
Anonymous
Nov 7th 2018
6 years ago